Serverless search with Meilisearch and Google Cloud Run
Serverless is a deployment strategy that is loosely defined by:
- Only paying per invocation.
- Not requiring any infrastructure management.
- Scaling to zero when unused.
While solutions exist for Compute, and Databases few options are available for Search engines. Particularly complex search engines that support faceting, full text search, and type ahead.
Meilisearch is a good option for all of the above, its also open source, and has a vibrant community.
This short blog will focus on a serverless deployment strategy for Meilisearch using Google Cloud Run.
Technology stack 
To give a good example we will use a live site as an example:
- Using NextJS as a site for testing search.
- Using Meilisearch for InstantSearch.
- Using google cloud run for 2 million free search requests a month.
- Using docker to run locally and build snapshots of our search engine.
The solution will work by building the index when the site is compiled for production.
In order to measure the effectiveness we will perform some testing:
- Load testing of the search engine API with https://artillery.io
- Global performance testing using https://lighthouse-metrics.com/
- Page by page comparison of server rendered pages https://pagespeed.compare/
here we go....
Design 
Unlike a continuously running search engine, this one will have pre-computed indexes. This is a serious limitation to a search engine, so, here is a short list of solutions this wouldn't be ideal for:
- Fast changing data, like stock levels on an e-commerce website.
- Data that is removed, edited or versioned multiple times a day, like the data in a CMS.
So when can this type of search engine be useful:
- For Static Websites where the contents are all known ahead of time e.g. Documentation sites or Blogs
To create this pre-computed index we will commit our files to source control, and use Google Cloud Build to create a new docker image.
Meilisearch Setup 
First, a multi-stage docker container is setup. The first stage local will be used locally from an accompanying docker-compose.yml.
# ../Dockerfile

FROM getmeili/meilisearch as local

ENTRYPOINT ["tini", "--"]
CMD     ./meilisearch

FROM local

# In production we copy in the dump data, seeding the index at build time
# Dumps: https://docs.meilisearch.com/reference/api/dump.html
COPY ./dumps /dumps

ENV     MEILI_HTTP_ADDR 0.0.0.0:7700
EXPOSE  7700/tcp

ENTRYPOINT ["tini", "--"]

CMD ["./meilisearch", "--import-dump", "dumps/latest.dump"]
The docker-compose.yml will target the local instance, and, mount the local ./data.ms (Meilisearch database).
# ../../../docker-compose.yml

version: "3.7"

services:
  local_search_engine:
    build:
      context: .
      target: local
    ports:
      - 7700:7700
    volumes:
      - ./data.ms:/data.ms
      - ./dumps:/dumps
When going into production, the production image will mount the ./data.ms committed to the repository. This will create a pre-built search container that can scale horizontally.
Seeding Data 
Data can be added to Meilisearch using the HTTP API or using one of the client libraries.
The Javascript client library suits this use case. To integrate it with existing tooling you need to consider your existing flow. Here is mine as an example.
- Source files are in a directory.
- Files are parsed by NextJS at
yarn build. - Output from parsing is JSON which can be sent to the search index.
// ../lib/seed-search-index.ts

import { MeiliSearch } from "meilisearch";
import { getSortedPosts } from "./api";

export const seedSearchIndex = async () => {
  const posts = getSortedPosts().map(({ date, ...rest }) => ({
    ...rest,
    date: Date.parse(date),
    objectID: Date.parse(date),
  }));

  try {
    // Create a search client
    const client = new MeiliSearch({
      host: String(process.env.NEXT_PUBLIC_SEARCH_URL),
    });

    // An index is where the documents are stored.
    const index = await client.getOrCreateIndex("blogs");

    const settings = await index.getSettings();

    await index.updateSettings({
      ...settings,
      // New blogs first
      rankingRules: [...settings.rankingRules, "date:desc"],
      // Synonyms are great when items have a shared meaning
      synonyms: {
        docker: ["container"],
        javascript: ["typescript", "node"],
        react: ["nextjs"],
      },
      // We will filter on the tags I use in my blogs
      filterableAttributes: ["tags"],
    });

    // Add the posts to the blogs index
    const response = await index.addDocuments(posts);

    console.info("Completed indexing", response);
  } catch (e) {
    console.warn("No connection found to build index", e);
  }
};
Each post is a javascript object with fields. An ID is created by using the timestamp. This means I can order by ID and have chronological ordering.
By using tags as a facet, I can allow people to filter blogs to subjects they are interested in.
This function is added to the index of the site, so that when the site is built with next build it compiles the search index as well. This is compatible with next dev, for local development, next build for serverless and server bound next production builds, and next export, the option of exporting next JS as a set of static files.
// ../pages/index.tsx

import { GetStaticProps, GetStaticPropsContext } from "next";
import { getSortedPosts } from "../lib/api";
import PostSummary from "../components/PostSummary";
import { seedSearchIndex } from "../lib/seed-search-index";
import { generateRSSFeed } from "../lib/rss";

export const getStaticProps: GetStaticProps = async () => {
  const posts = getSortedPosts();
  // Seed the index at compile
  await seedSearchIndex();

  await generateRSSFeed(posts);

  return {
    props: {
      posts,
    },
  };
};

export default function Home({ posts }) {
  return (
    <main>
      <h1>Blogs</h1>
      {posts.map((post) => (
        <PostSummary {...post} key={post.date} />
      ))}
    </main>
  );
}
Server rendering search pages 
Benefits 
- Server rendered pages work better with SEO.
- Server rendered pages support users that have javascript disabled.
- Server rendering search with Algolia react-instantsearch means that you can have complex URL's, including, Query strings, Page numbers, Facets.
- Rendering on the server means that we won't have to deal with pending states, loading spinners, and skeletons because what is on the page when the HTML is parsed will be the same as what is on the pages once the DOM has been hydrated with the state from React.
An example would be something like this:
This server rendered page works by:
- Parsing the URL query parameters
- Making a request to the search engine
- Returning an initial result state to the NextJS render to string process.
// ../pages/search.tsx

import { withRouter } from "next/router";
import { findResultsState } from "react-instantsearch-dom/server";
import qs from "qs";
import { GetServerSideProps } from "next";

import {
  App,
  AlgoliaPage,
  DEFAULT_PROPS,
} from "../page-components/search-page";

// This is a standard SSR implementation of algolia. Next JS exposes the full
// query object, so we can perform full server rendering
export const getServerSideProps: GetServerSideProps = async ({ query }) => {
  const searchState = query ? qs.parse(query) : {};

  const resultsState = await findResultsState(App, {
    ...DEFAULT_PROPS,
    searchState,
  });

  return {
    props: {
      resultsState: JSON.parse(JSON.stringify(resultsState)),
      initialSearchState: searchState,
    },
  };
};

export default withRouter(AlgoliaPage);
Deployment 
This is currently a joint deploy between Vercel for hosting my blog site, and google cloud run which will host the search index.
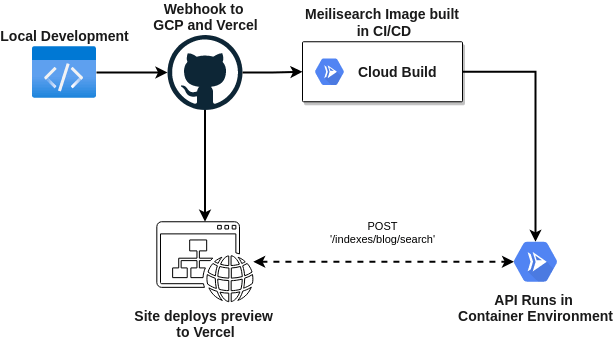
- Merge a commit to
main. - Trigger a redeploy of the front end with the new blog post.
- Trigger a google cloud build of a new docker container with the new blog post in its search index.
- Google Cloud Build promotes the container after it builds successfully
Load testing 
I am going to perform a load test on Meilisearch deployed using cloud run, to do this I am going to use artillery.
I have a really small container deployed, this is actually the smallest configuration available:
| v.CPU | Memory | Maximum Requests Per Container |
|---|---|---|
| 1 | 128 | 250 |
Artillery Results 💣 
Artillery load tests are written in YAML. so lets take al look at mine:
# ../_snippets/serverless-search/artillery/small/load-test.yml

config:
  target: https://meillisearch-kjsckj2bja-ew.a.run.app
  http:
    timeout: 10
  phases:
    - duration: 20
      arrivalRate: 10
      name: "Normal Traffic"
    - duration: 5
      arrivalRate: 50
      name: "Spike"
    - duration: 20
      arrivalRate: 10
      name: "Normal Traffic"
    - duration: 5
      arrivalRate: 50
      name: "Spike"
    - duration: 20
      arrivalRate: 10
      name: "Normal Traffic"
scenarios:
  - flow:
      - post:
          url: "/indexes/blogs/search"
          json:
            {
              "q": "",
              "limit": 200,
              "facetFilters": [["tags:cicd"]],
              "facetsDistribution": ["tags"],
              "attributesToHighlight": ["*"],
            }
Aggregate 
Responses
As expected all fo the HTTP status codes from the 1100 requests have come back with a 200 success.
| HTTP Code | Count | Total | Percentage |
|---|---|---|---|
| 200 | 1100 | 1100 | 100 |
Latency
The statistics below show that the free search engine is quite performant!
| Avg. RPS | min (ms) | max (ms) | median (ms) | p95 (ms) | p99 (ms) |
|---|---|---|---|---|---|
| 15.62 | 50.8 | 417.1 | 59.6 | 148.1 | 292.5 |
Performance testing 
Performance testing is about measuring the one off delivery of the page to the end user, fully rendered.
There are a number of great tools for this:
- First and foremost your own dev tools with light house, be sure to use an incognito tab for this to avoid bundling react dev tools etc.!
- Lighthouse Metrics, a tool for global light house metric measuring https://lighthouse-metrics.com/
- Page speed compare to compare different pages, and different websites https://pagespeed.compare/
Global Lighthouse Scores 
For this test, we want to measure the performance around the globe, for people visiting our search page, and entering a complex query:
- Lighthouse version: 6.3.0
- Simulated device Moto G4 (2016)
- 4x CPU Throttling
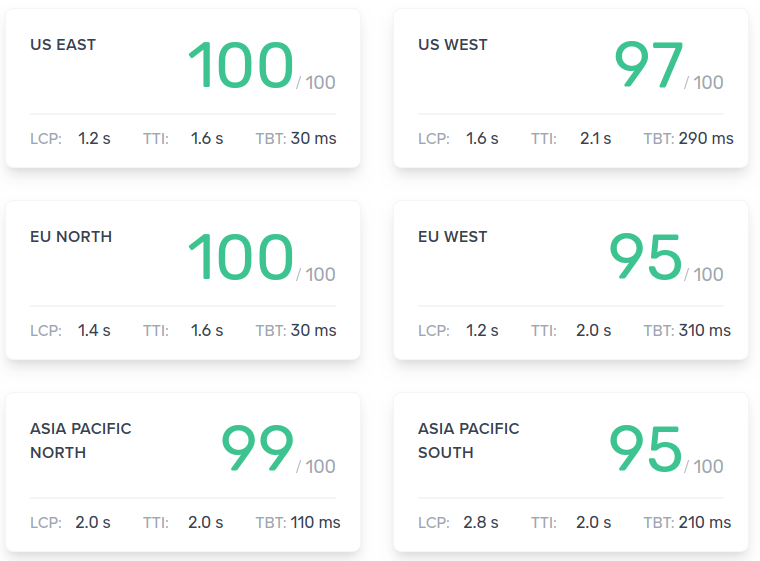
These scores look good enough to me. What I am most pleased about is that we achieved a max time to interactive of 2.1s. Its always good to keep this under 3 seconds. Running on a 5 year old device, with CPU throttling enabled is a great way to ensure we have a site that is accessible to users with low powered devices, all over the globe.
Page Comparison 
Page speed compare is what I will use for this one:
| Label | URL | Perf. | FCP (ms) | SI (ms) | LCP (ms) | TTI (ms) | TBT (ms) | CLS (score) |
|---|---|---|---|---|---|---|---|---|
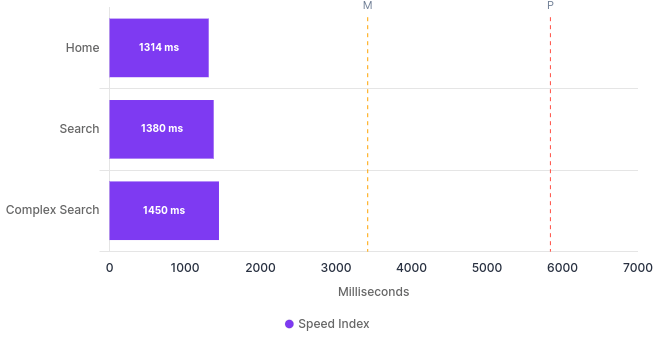
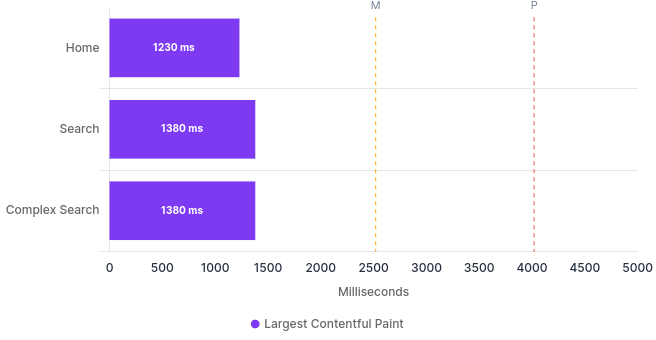
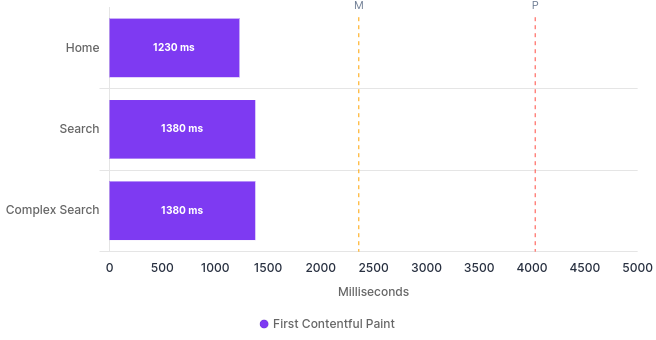
| Home | Home | 100 | 1230 | 1314 | 1230 | 1372 | 17 | 0 |
| Search | Search | 100 | 1380 | 1380 | 1380 | 2057 | 126 | 0 |
| Query | Query | 99 | 1380 | 1450 | 1380 | 2179 | 187 | 0 |
The big hitters in this table are Cumulative Layout Shift (CLS) of zero, for all pages. This means we have nothing initially rendered, then shifted after our javascript kicks in. Performance is high for all the pages, which is also really good. Overall these are great numbers.
Speed Index 
Largest Contentful Paint 
First Contentful Paint 
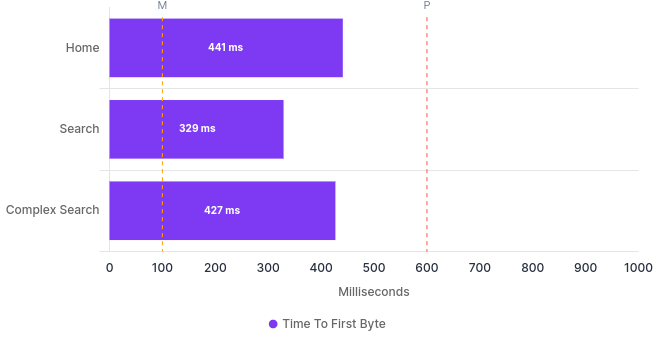
Time to First Byte 
Wrap Up 
Well that was a bit of a journey, but thanks for sticking around, lets recap.
- I showed how we can build a serverless search engine using Meilisearch.
- I gave some examples of seeding this search engine into a NextJS site.
- I went into detail about testing, both load, and performance testing.
I have been using this with my own blog for a few months, and overall, I am really happy with the setup.
Thanks for reading 👍